Figma MCP: A Design-to-Code Pipeline for Scalable Products Across Multiple Projects
How to use Figma MCP Server to connect your Design System with AI Coding Tools and build a Design-to-Code Pipeline that scales across multiple projects — based on real-world experience managing enterprise-level Design Systems
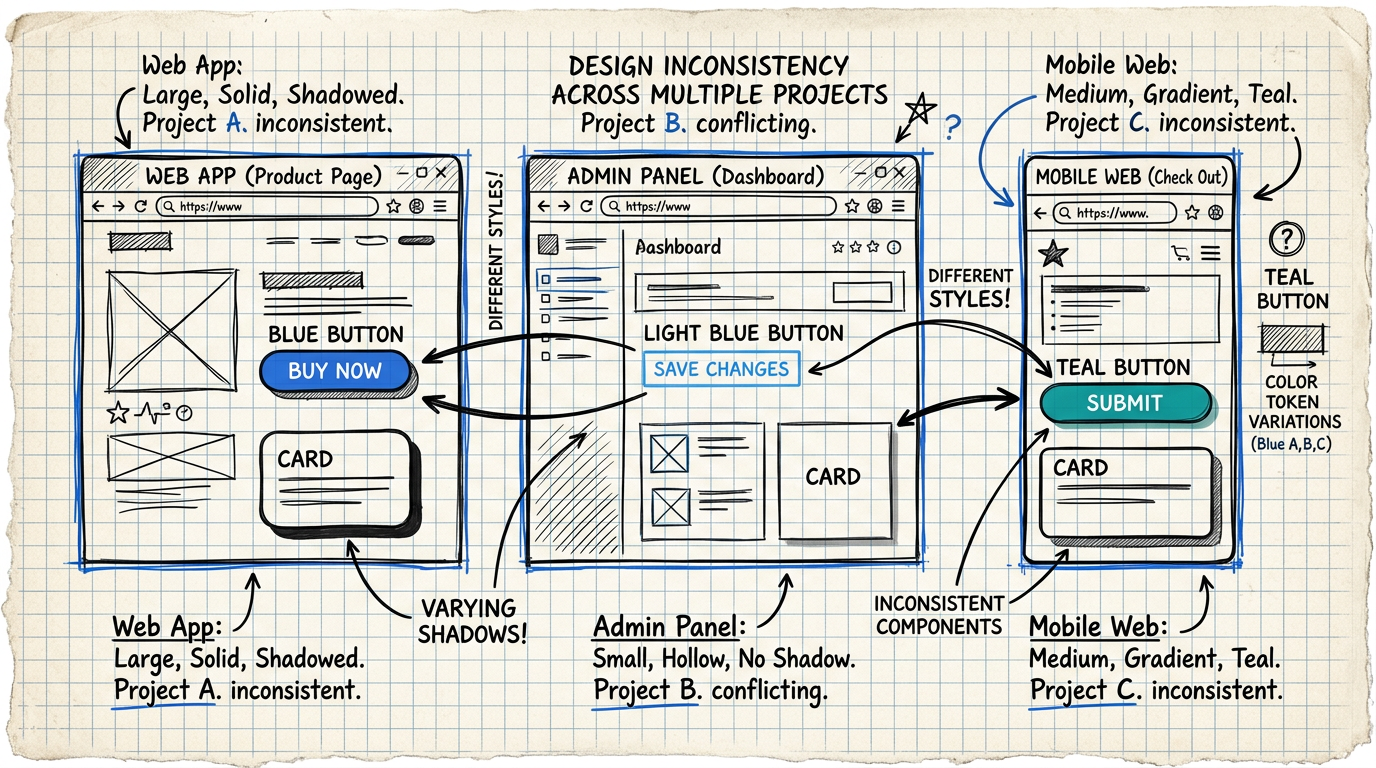
The Problem Every Design Team Faces
If you've ever maintained a Design System used across multiple projects, you know exactly how much of a nightmare it can be.
A Button in Project A uses border-radius: 8px while Project B uses 12px. A Card component in the Dashboard app has a different shadow than the Mobile app. A color token named primary-500 in Figma gets called brand-blue in code by developers.
Every time you hand off a design to dev, it's like a game of Telephone — information drifts little by little until the final result no longer matches the design.
The more projects you have, the worse it gets. The problem doesn't scale linearly — it's exponential.
What Is Figma MCP?
MCP stands for Model Context Protocol — an open standard created by Anthropic that allows AI models to connect with external tools in a structured way.
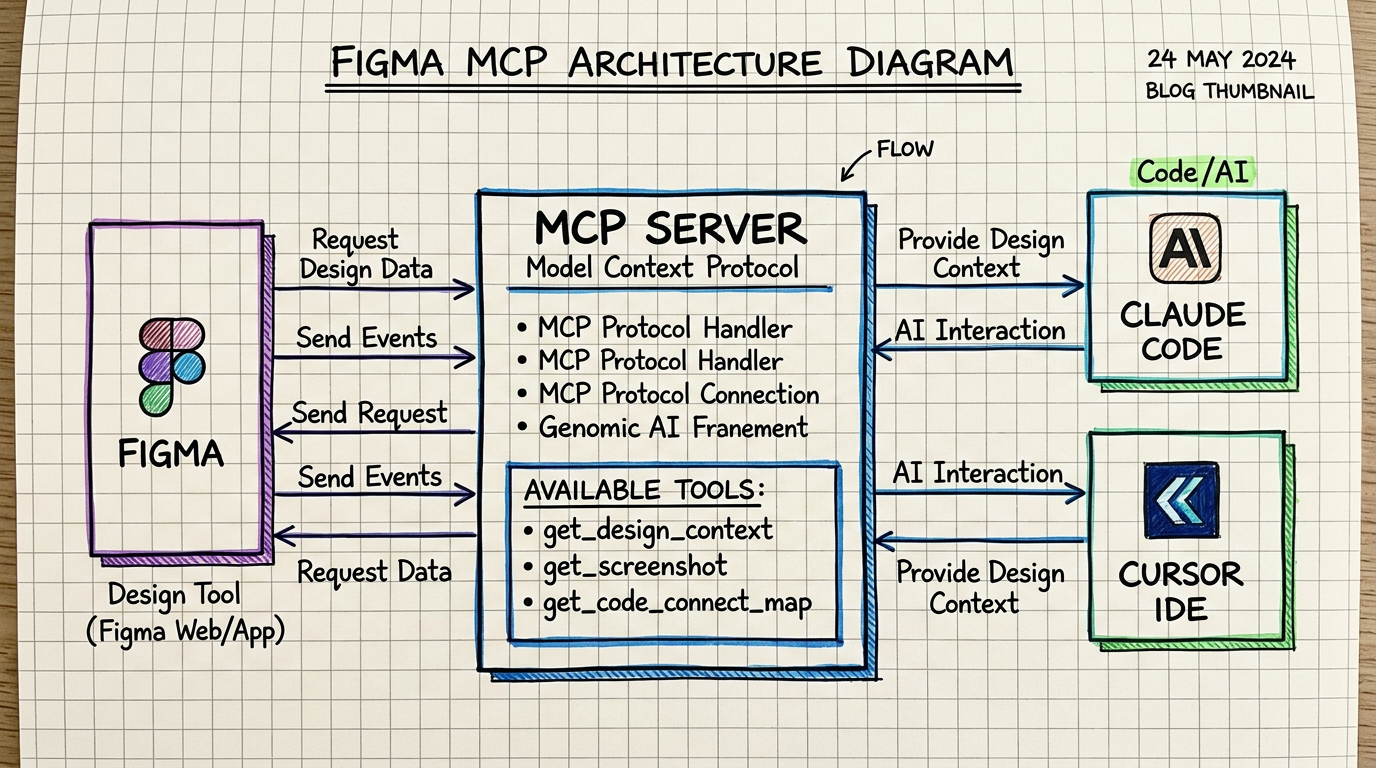
Figma MCP Server is a bridge between Figma and AI coding tools like Claude Code, Cursor, or Windsurf. It enables AI to:
- Read designs directly from Figma (components, layout, spacing, colors)
- Understand design context — not just pixels, but hierarchy, component structure, and design intent
- Generate code that matches your project's design system, not generic code
- Map components between Figma components and codebase components via Code Connect
Think of it as a translator fluent in both the language of Design and the language of Code — one that also understands your project's context.
Why MCP Is a Game-Changer for Multi-Project Teams
Before MCP: The Copy-Paste Hell
Before MCP, the typical design-to-code workflow looked like this:
- Designer creates the design in Figma
- Developer opens the Figma inspect panel
- Copies CSS values one by one (padding, margin, font-size...)
- Builds a new component based on the styles they see
- QA finds it doesn't match the design → fix → repeat
Each project goes through this process independently, with no shared understanding between projects.
After MCP: Single Source of Truth
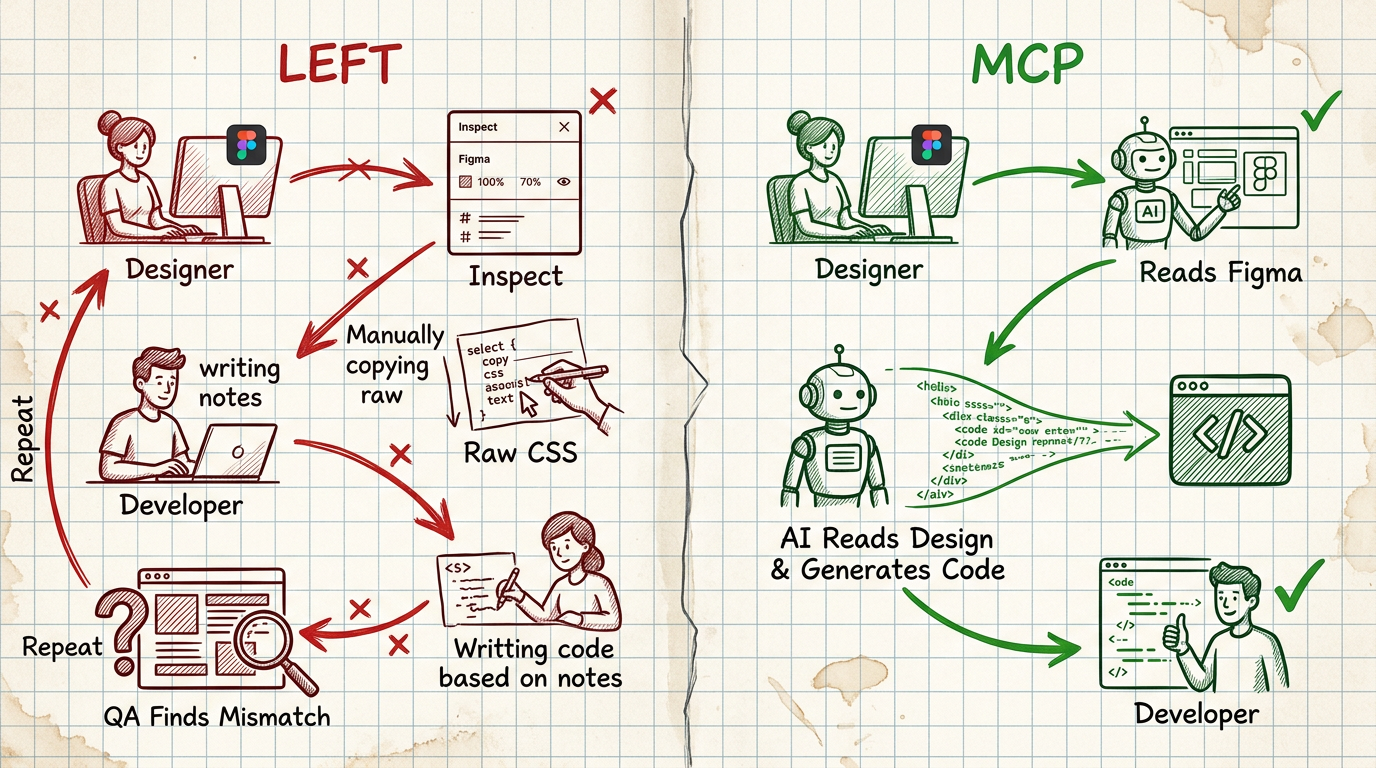
With Figma MCP, the workflow becomes:
- Designer creates the design in Figma (same as before)
- AI reads design context directly from Figma
- AI generates code that matches the project stack (React, Vue, Svelte, etc.)
- Code Connect maps Figma components → codebase components
- Every project uses the same mappings → consistency across projects
How to Set Up Figma MCP for Multiple Projects
Step 1: Enable the Figma MCP Server
In Claude Code or any AI tool that supports MCP, add the Figma MCP Server through its settings. Figma MCP is an official server provided by Figma.
Step 2: Understand the Core Tools
Figma MCP provides several key tools you should know:
get_design_context— Fetches the design along with code, screenshots, and hints (the most frequently used tool)get_screenshot— Captures the design for visual referenceget_metadata— Retrieves file structure and page informationget_code_connect_map— Views mappings between Figma and Code componentsadd_code_connect_map— Adds new mappings
Step 3: Create Code Connect Mappings
This is the heart of scalability — Code Connect is a mapping that tells the system which Figma component corresponds to which code component.
Figma "Button/Primary"  →  <Button variant="primary" />
Figma "Card/Product"     →  <ProductCard />
Figma "Input/Text"       →  <TextField />
When AI sees a Button/Primary in a Figma design, it will generate code using <Button variant="primary" /> from your component library — rather than building a new button from scratch.
Step 4: Share Mappings Across Projects
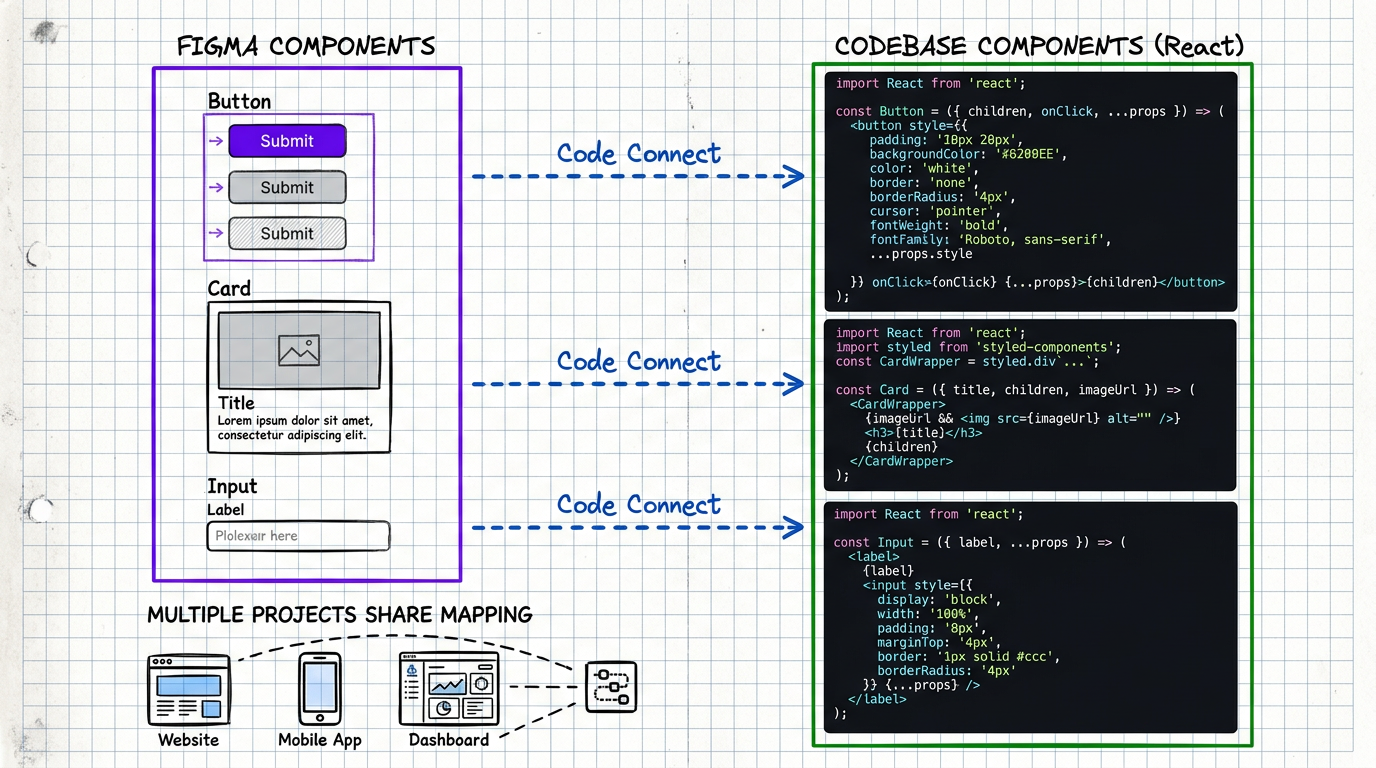
Key insight: Code Connect mappings can be shared across projects if every project uses the same shared component library (e.g., an internal design system package).
Project A (Web App)      → uses @company/ui-kit
Project B (Admin Panel)  → uses @company/ui-kit
Project C (Mobile Web)   → uses @company/ui-kit
                              ↑
                    Code Connect maps to this
Every project gets consistent code that references the same components.
Real-World Workflow: From Design to Production
Let's walk through a real example of what this workflow looks like in practice.
1. Designer Sends a Figma URL
The designer sends the link to a completed design, such as figma.com/design/abc123/Dashboard?node-id=42:1337
2. AI Reads the Design Context
AI uses get_design_context to pull information from Figma:
- Code: React + Tailwind code that Figma generates as a reference
- Screenshot: The actual design image for visual verification
- Hints: Design tokens, spacing values, component names
3. AI Adapts to the Project
This is the crucial part — AI doesn't use the code from Figma as-is. Instead, it adapts the output to fit the project stack:
- Uses existing components from the codebase (via Code Connect)
- Maps design tokens to the project's token system
- Follows project conventions (naming, file structure, patterns)
4. Review & Iterate
Developers review the AI-generated code, make adjustments as needed, and commit. When iteration back to Figma is required, it happens quickly because the design-code connection is clear.
Scaling Strategies for Multiple Projects
Strategy 1: Centralized Design System + Distributed Code Connect
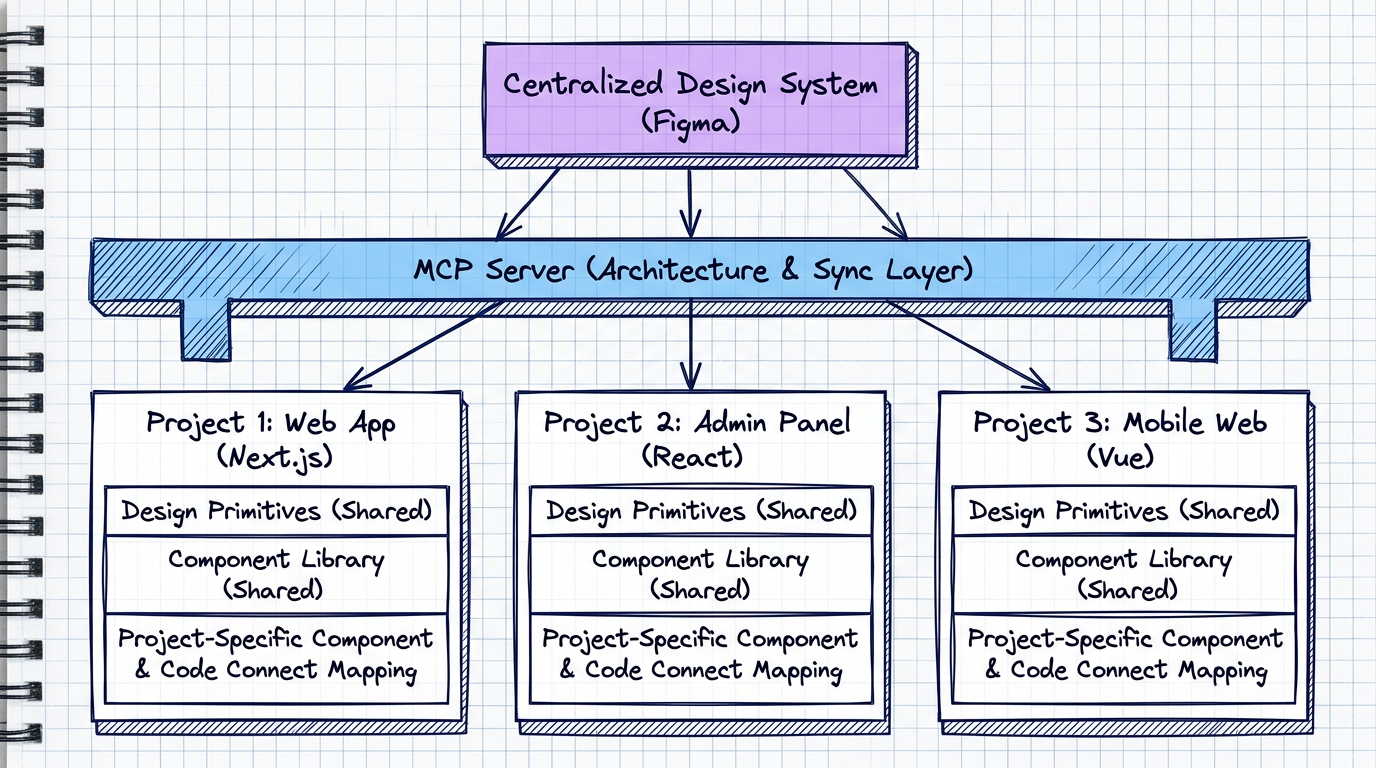
- Maintain 1 Figma Design System library that every project references
- Each project has its own Code Connect mapping (since stacks may differ)
- Design tokens sync via Figma Variables → CSS Variables
Strategy 2: Design System Rules
Use create_design_system_rules to define your design system's rules:
- Component usage guidelines
- Spacing and sizing conventions
- Color token naming conventions
- Typography scale rules
These rules help AI generate consistent code even when working across different projects.
Strategy 3: Progressive Code Connect
Don't try to map every component upfront — take a progressive approach:
- Start with core components (Button, Input, Card, Modal)
- Add layout components (Grid, Stack, Container)
- Gradually add domain-specific components (ProductCard, PolicySummary)
Every time AI needs to generate a new component that should be a shared component, add it to the Code Connect map immediately.
Lessons Learned from Real-World Usage
Benefits
- Dramatically reduces the design-code gap — instead of inspecting properties one by one, AI reads the entire design context in a single pass
- Consistency across projects — Code Connect ensures every project uses the same components
- Reduces handoff time by 60-70% — Designer sends a Figma link, AI handles code generation, developer reviews
- Higher Design System adoption — when AI automatically uses design system components, developers follow suit
Things to Watch Out For
- Figma designs must be well-structured — if the design doesn't use Auto Layout or has poorly named layers, AI will generate poor code
- Code Connect requires maintenance — when the component library updates, the mappings need to be updated too
- AI isn't perfect — you still need to review code every time, especially for responsive behavior and edge cases
- Security considerations — Figma MCP accesses your design files, so make sure access controls are properly configured
The Future of Design-to-Code
We're at an incredibly exciting inflection point in the design-to-code workflow.
Figma MCP is just the beginning. Here's what's on the horizon:
- Bi-directional sync — not just design → code, but code → design as well
- Automated design QA — AI verifying whether implementation matches the design
- Cross-platform Code Connect — a single mapping that works across Web, iOS, and Android
- Design System as Code — a design system defined in code that generates Figma components
For teams managing multiple projects, now is the best time to start building a design-to-code pipeline that scales.
Because the question is no longer "Should we use AI for design-to-code?" — it's "When do we start?"